Showing posts with label How To ?. Show all posts
How to Fix Windows 8.1 Update Issues
With any new software update on any device, there are going to be small hiccups, little issues that cause users to not be able to download the update even though they should be able to. Windows 8.1, the free update for tablets, desktops and notebooks running Microsoft’s Windows 8 operating system isn’t any different.
Since its release users have reported random issues with not being able to download the update. Here’s what to do when Windows tells you your Windows 8.1 install couldn’t be completed.
Before proceeding, it’s a good idea to simply close the Windows Store app by clicking or tapping on its top and dragging it to the bottom of our screen. Then trying the update again. This could fix your issue and save you from having to proceed with the rest of this process. If that still hasn’t helped then continue.
The first thing you want to do if you see the error above on your screen is to restart your Windows 8 devices and try again. Remember to save any work you’ve been doing in the background before you restart first. After you’ve restarted, don’t open the Windows Store app.
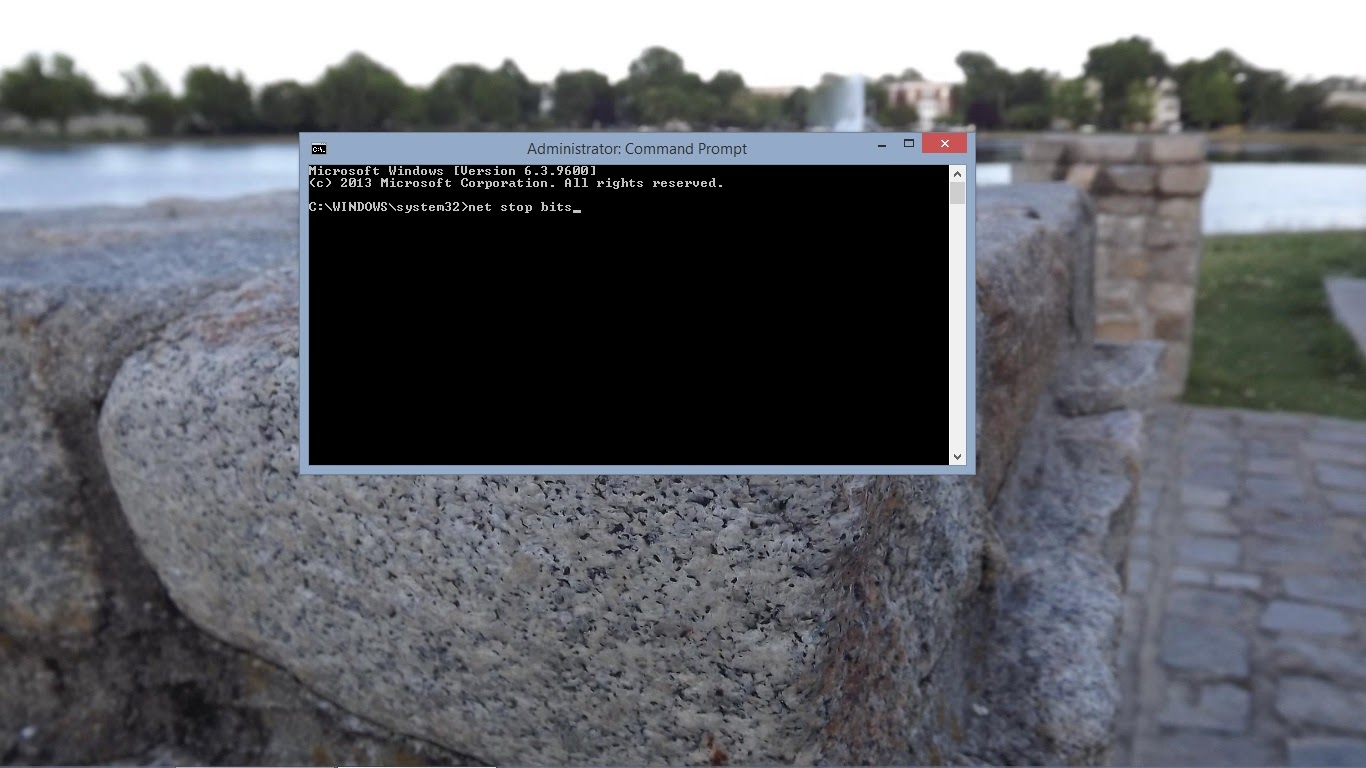
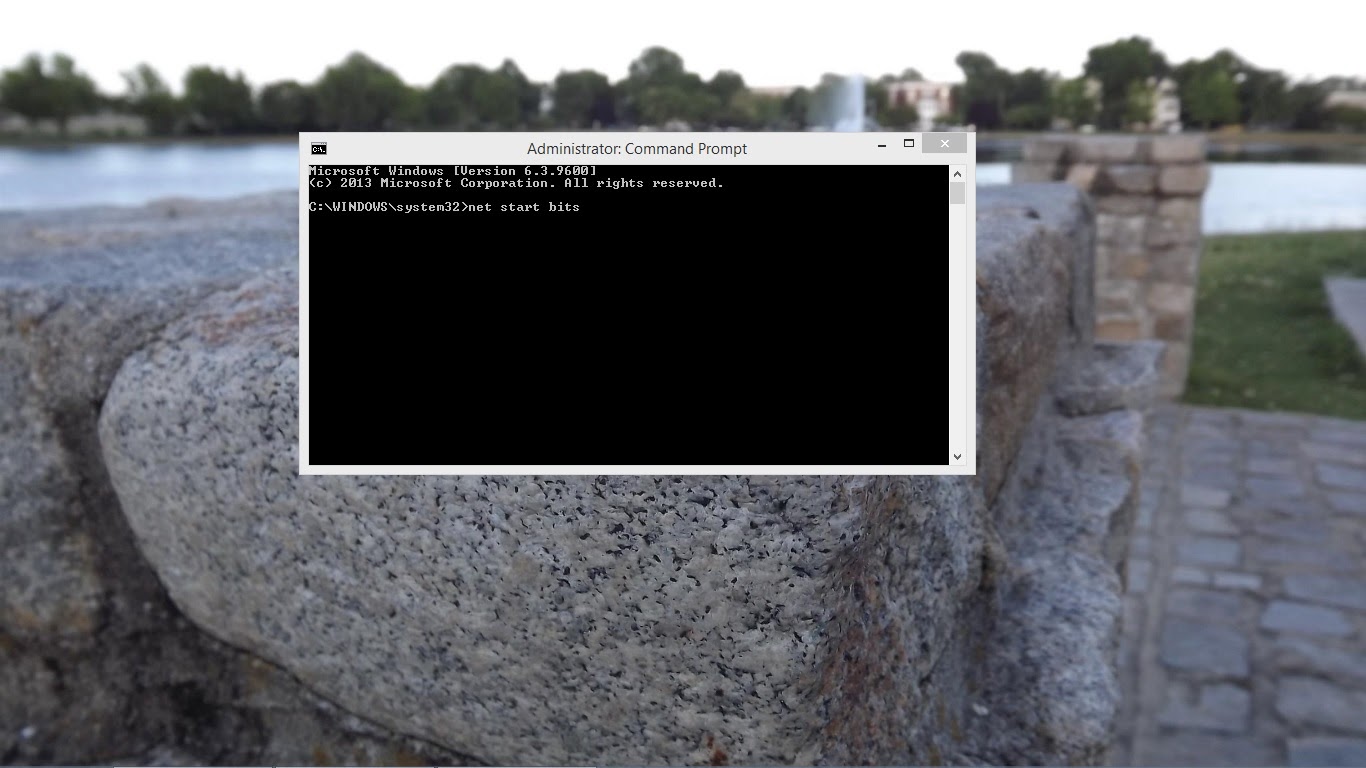
If you’re still having trouble downloading the update. You’re going to need to open the Windows 8 Command Prompt. Go to the Start Screen by pressing the Windows key on your keyboard or by pressing the Windows button underneath your device’s display.
Right-click anywhere on the Start Screen and click on the All Apps button.
Now, find the Command Prompt option in the list of installed apps. Don’t left-click on it. Instead, right-click on it and select Run As Administrator from the menu on the bottom. Tablet users should place their finger on Command Prompt and then pull down on the app slightly to see the app menu.
In the menu type ‘net stop wuauserv’ then hit enter on your keyboard.

Now type ‘net stop bits’ then hit enter on your keyboard again.
Now open a file window by going back to the Desktop. Go the following location by manually typing it into the address bar or by copy and pasting it into the address bar in a file window: C:\Windows\SoftwareDistribution. Delete everything inside that folder.
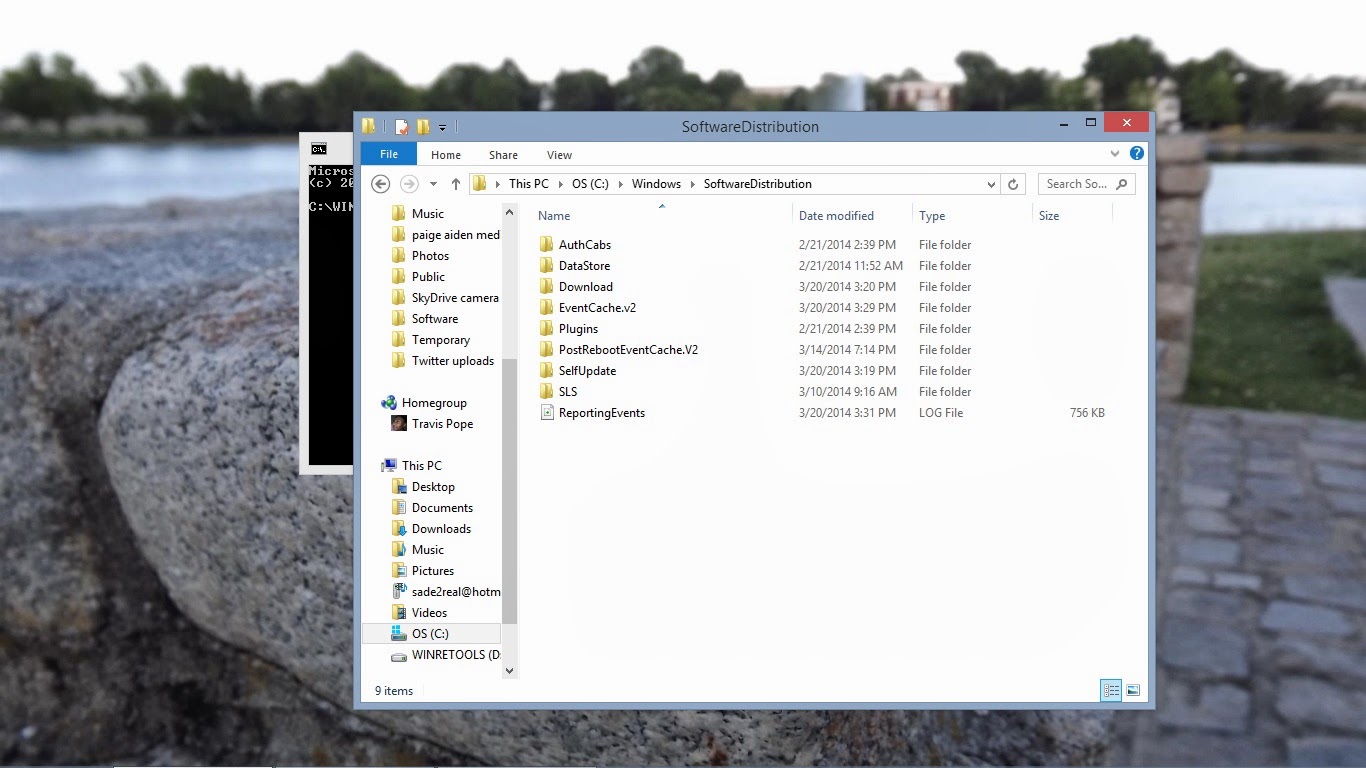
Now go back to the Command Prompt and type in ‘net start wuauserv’ then hit enter.

Next type ‘net start bits’ then hit enter.
Now head to the Windows Store and attempt to download Windows 8.1 again.
By now, you should be able to download the Windows 8.1 without any issues. Remember to make sure you’re on a stable internet connection and that your Windows 8 device is plugged in.
HOW TO CREATE A TORRENT ?
Torrents are great, they are the best way to share large files with your friends, or even with people you don't know at all. But surprisingly enough, not many people create torrents when they need to share something. I have "a lot of" friends who know how to download torrents, but when they need to send me their latest 200MB vacation picture collection, they ask me to "get on msn".
It’s not that I have anything against msn (although the file transfer sucks), but why don’t just use BitTorrent? Especially if you want to send something to more than one person, or if you want to share high quality HDTV files, because then you can share the bandwidth.
So how do you do this? Well it’s very simple. Open your favorite BitTorrent client and do the magic trick:
file > create torrent
That’s all? Well almost. All you need to do now is put in the tracker info and tick some boxes. This can differ somewhat from client to client but it all comes down to the same thing.
uTorrent
1. File > Create new Torrent (or CTRL + N)
2. Select the files and or directories
2. Select the files and or directories
3. Trackers: This is probably the hard part for most people. But it’s pretty easy, just put in one of the popular public trackers. You can use one or more trackers, but in general one is enough.
Here are some good trackers you can use:
http://open.tracker.thepiratebay.org/announce
http://www.torrent-downloads.to:2710/announce
http://denis.stalker.h3q.com:6969/announce
udp://denis.stalker.h3q.com:6969/announce
http://www.sumotracker.com/announce
Put one of these in the tracker box
4. Do NOT tick the private torrent box (unless you’re using a private tracker)
5. Save the torrent and send it to your friends
Bitcomet

1. File > Create Torrent (or CTRL + M)
2. Select the files and or directories
3. Select “enable public DHT network” from the dropdown box
This way you can be your own tracker if the public tracker goes down.
This way you can be your own tracker if the public tracker goes down.
4. Tracker server and DHT node list
Again, This is probably the hard part for most people. But it’s pretty easy, just put in one of the popular public trackers. You can use one or more trackers, but in general one is enough.
Again, This is probably the hard part for most people. But it’s pretty easy, just put in one of the popular public trackers. You can use one or more trackers, but in general one is enough.
Here are some of the most popular trackers at the moment:
http://open.tracker.thepiratebay.org/announce
http://www.torrent-downloads.to:2710/announce
http://denis.stalker.h3q.com:6969/announce
udp://denis.stalker.h3q.com:6969/announce
http://www.sumotracker.com/announce
Put one of these in the tracker box
5. Save the torrent and send it to your friends
Azureus

1. File > New Torrent (or CTRL + N)
2. Tick “use an external tracker”.
And again, This is probably the hard part for most people. But it’s pretty easy, just put in one of the popular public trackers.
And again, This is probably the hard part for most people. But it’s pretty easy, just put in one of the popular public trackers.
Here are some of the most popular trackers at the moment:
http://tracker.prq.to/announce
http://inferno.demonoid.com:3389/announce
http://tracker.bt-chat.com/announce
http://tracker.zerotracker.com:2710/announce
Put one of these in the tracker box
3. Select single file or dicectory, click NEXT and point to the file or directory you want to share, and click NEXT
4. Do NOT tick “private torrent”
5. Do tick “allow decentralized tracking”
6. Save the torrent and send it to your friends
& you are done.....
How to create signature in Gmail with image, logos and HTML links
 In this post we will see how to create signature in Gmail with image, logos and HTML links. One of the best ways to promote your business or brand is by email and we have made an article about importance of email marketing.
Sending an email to your customers and loyal subscribers from your own domain name rather than using Gmail shows the uniqueness of your brand.
1. Login to your Gmail account and drop down the geared symbol at the top right corner and open settings.

2. In general settings scroll down and you will see signature settings. Enable signature.

3. You have many options to add in your signature. To add text signature enter your address details or your name. Now you can select your font styles, font size and font color.

4. To insert image in signature click insert image icon and add it align it as you wish.
5. To link the signature image click on the image you inserted and select the link icon and enter the URL of the page.

6. Once done scroll down and click save changes.

Now whenever you send an email you will have a signature added below. Hope this article helped you on how to create signature in Gmail with images, Logos and HTML links.

Tag :
How To ?,
Tips n Tricks,
How to Record High-Quality Audio of Phone Calls on Your Android Phone

While the legality of secretly recording phone calls varies in each country, sometimes it's useful to have audio documentation of conversations you have on your Smartphone.
There are plenty of reasons you'd want to be able to record phone calls, from important conversations, to threatening phone calls, or to just trying to capture a friend's embarrassing moment. It's even a good idea to record your calls to customer service representatives, especially if you know they're recording you.
This is an app you'll need to rule them all—no root required.
High-Quality Phone Call Recording
MP3 InCall Recorder & Voice, a free Android app from dev Grinzone, records your phone conversations and saves them in high-quality MP3 format.Using MP3 InCall Recorder & Voice
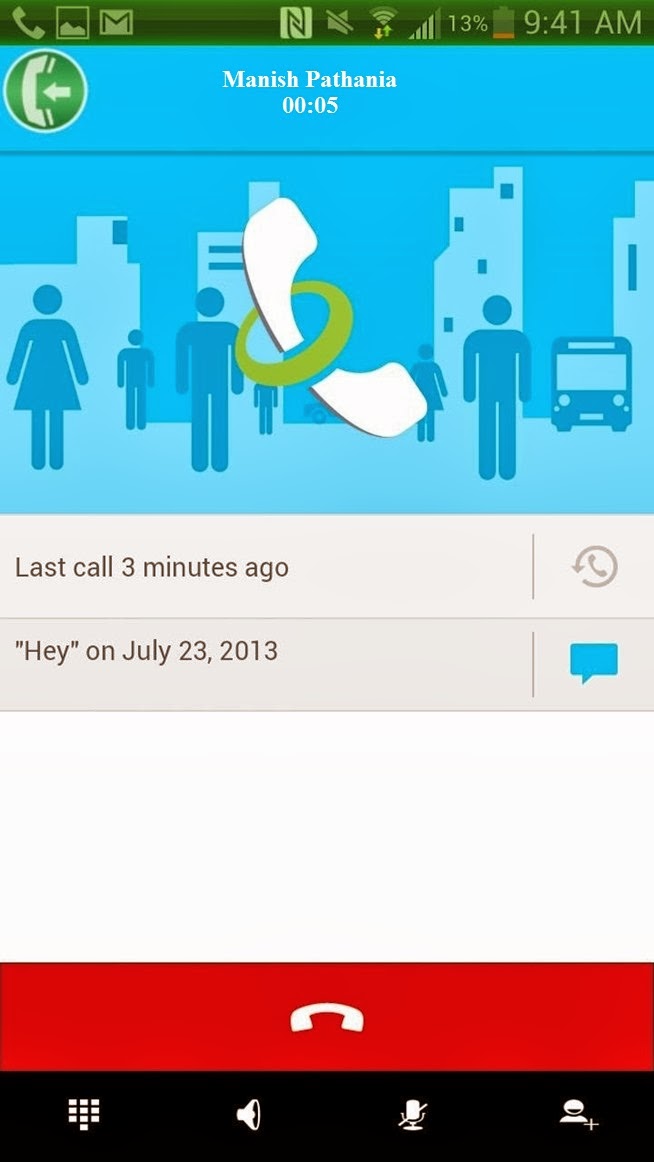
Once you download the app, you can make a phone call and start to record. The record button (which is the green circle located in the upper left hand corner) will now show up—which you can then tap to start the recording. If you go directly into the app, you can use it as a simple voice recorder as well.

Listening/Editing Your Recordings
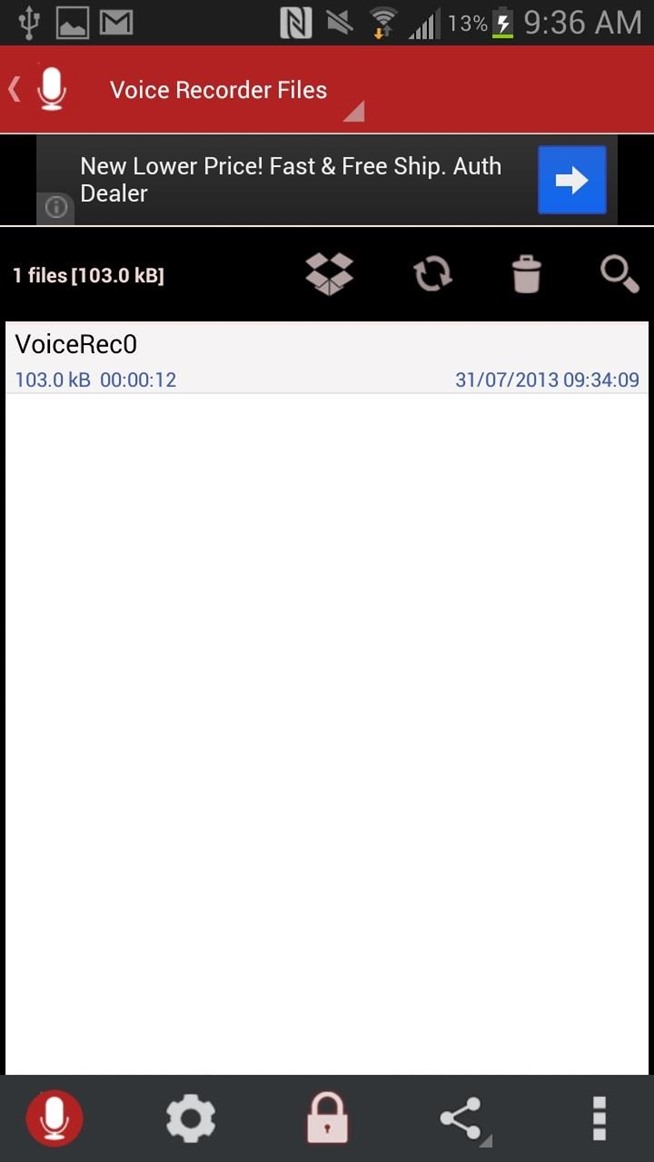
From inside of MP3 InCall Recorder & Voice, you can view a list of all of your recordings, with the length and date recorded in the description. If you want to listen to it, tap on the recording and press the play button.
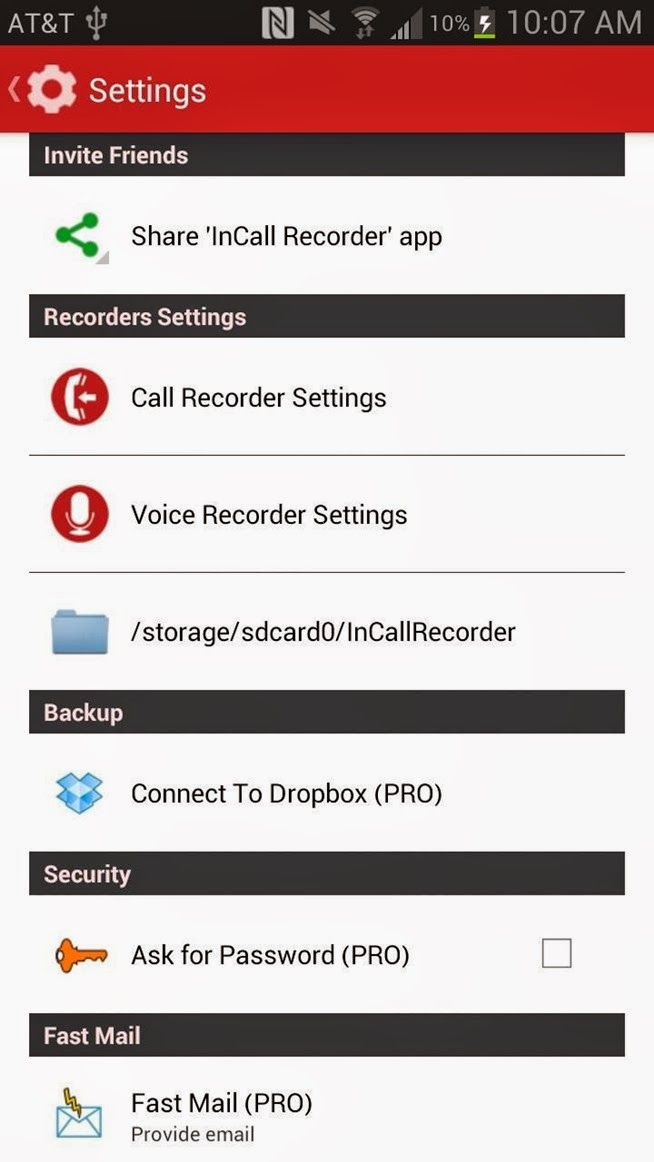
An equalizer is also available to tinker with in order to get the best sound for your recording. You can also check out the settings, share your recordings, upload them to Dropbox, and delete them—all from the icons scattered across the homepage.
Changing Your Settings
Tapping on the gear icon at the bottom of the homepage will take you to the settings, where you can mess with things such as recording mode (automatic or manual), set contacts to automatically record, delay recording time, record button placement, audio source, and more.
.jpg)
For certain settings, you'll need to have the pro version. If you want to, just tap on the lock icon and purchase it for a dollar from inside the app. With pro, you'll be able to automatically record phone calls, add comments to a recording, set voice recording as ringtone, and more.
Now you can go ahead and record all of your conversations and keep them for future reference.....
How to Get Some of the Best Moto X Features on Your Android Phone Now

While the Moto X hasn't been turning many heads for its specs, it does offer some unique software features that catch the eye of users and developers. Some have already been recreated for other devices, while some have existed before. Not everything is available, but here are some of the things the Moto X promises that you can do right now.
Get Active Notifications on AMOLED Devices

AMOLED-based displays have the unique ability to only light up certain pixels as needed. The Moto X utilizes this to display notifications on your lockscreen on a black background so that you can see what needs your attention while using minimal battery power. Fortunately, some benevolent developers have brought similar functionality to the Play Store with ActiveNotifications.
At the moment, the app requires Android 4.3 which means it's out of reach for nearly all Android devices outside the Nexus line. Even then, only the Galaxy Nexus has an AMOLED display that will actually result in better battery life. However, the developer is working on bringing it to more devices, so it's worth keeping an eye on.
Launch Apps With a Flick of Your Wrist
 Another neat Moto X trick is the ability to launch the camera app by shaking your phone a bit. For this, you can grab Twisty Launcher from the Play Store. The app allows you to set specific apps to launch when you perform certain gestures with your phone.
Unlike the Moto X, it's not limited to just launching the camera app, nor is it tied down to a single gesture. By default, you can "chop" twice to launch the camera, but there are also two motions you can perform that will activate apps of your choosing. You can even customize the chopping gesture and choose whether they will activate at the lock screen or not.
Read Text Messages Aloud and Respond While Driving

Motorola also introduced a simplified new app for getting things done while driving: Motorola Assist. It automatically detects certain circumstances and alters your phone's behavior. While you can accomplish much of the time-based or location-based actions with Tasker, previously-covered Robin is a great way to receive and respond to messages while you're out and about.
The app runs in the background of whatever you're doing and can be triggered by waving your hand in front of the display. It's not entirely as hands-off as the Moto X's always-listening mode, but it does allow conversation-style voice commands so you can instruct it to read you a text message and then transcribe a response without touching your phone. Given that texting behind the wheel is almost universally banned, this is a much better solution.
Unfortunately, not everything the Moto X can do is available on other devices. For example, the phone is able to listen for voice commands at all times, even when the phone is off. As one engineer explains, this is only possible due to extra processing cores that offload the burden to prevent battery drain. Until a developer figures out a way around this (or just releases a version that has the feature, battery-be-damned), it probably won't show up on many other phones. Between that and the customizable hardware, there are still reasons to look at the Moto X, but most of the clever features are already available or will be soon.
How to Block a Phone Number From Calling Your Android Phone

Blocking a phone number from calling you should be fairly simple in 2013, but it still isn’t.
Android doesn’t have a completely integrated blocking solution, and carriers don’t
generally offer this basic service for free.
Android doesn’t have a completely integrated blocking solution, and carriers don’t
generally offer this basic service for free.
Luckily, there are a variety of ways to block calls anyway, whether you’re dealing with
telemarketers that won’t stop calling or other annoying people that just won’t leaveyou alone.
telemarketers that won’t stop calling or other annoying people that just won’t leaveyou alone.
Integrated Phone Number-Blocking Options
Google doesn’t build the capability to block calls into Android. However, some
manufacturers add this feature to their custom skins. For example, some Samsung phones
include this feature.
manufacturers add this feature to their custom skins. For example, some Samsung phones
include this feature.
To use this feature, open the Phone app on a Samsung phone, tap the Menu button, and
navigate to Call settings -> Call rejection -> Auto reject list. You can check the Unknown
option to automatically reject all calls from “Unknown” numbers or tap the Create button
and add individual phone numbers you want to block to the list.
navigate to Call settings -> Call rejection -> Auto reject list. You can check the Unknown
option to automatically reject all calls from “Unknown” numbers or tap the Create button
and add individual phone numbers you want to block to the list.
Silence Calls or Send Calls to Voicemail
Android does provide a way to have specific numbers always go to your voicemail or play
a silent ringtone that won’t disturb you if your phone is in your pocket.
a silent ringtone that won’t disturb you if your phone is in your pocket.
If you set up this feature, you may still end up with voicemails from the number. However,
if they’re a telemarketer, they likely won’t leave you a voicemail — so this feature may be
more than good enough for blocking the most annoying telemarketers. If someone’s
constantly leaving you voicemail messages, this won’t stop them.
if they’re a telemarketer, they likely won’t leave you a voicemail — so this feature may be
more than good enough for blocking the most annoying telemarketers. If someone’s
constantly leaving you voicemail messages, this won’t stop them.
To use this feature, just add the number you want to block to your contacts. You can do
this by opening the Dialer app, swiping over to the history tab, and tapping the number.
Tap
the Add to contacts option and the number will be added to your phone’s contacts.
this by opening the Dialer app, swiping over to the history tab, and tapping the number.
Tap
the Add to contacts option and the number will be added to your phone’s contacts.

Go through the contact-adding process and name the contact. You could also add a
contact manually, not from the dialer — just ensure the contact is associated with the
phone number you want to block.
contact manually, not from the dialer — just ensure the contact is associated with the
phone number you want to block.

Once you’re done, go into the People app and tap the contact you added. Tap the
menu button and select All calls to voicemail to automatically send the number’s calls
to voice mail or tap Set ringtone and select None to associate the caller with a silent
ringtone.

Block Calls With a Third-Party App
If you actually want to block calls and this feature isn’t integrated into your phone,
you may want to try using a third-party app like Mr. Number. You can use apps like this
one to automatically hang up on calls, effectively blocking them and preventing them
from even getting to your voicemail.
you may want to try using a third-party app like Mr. Number. You can use apps like this
one to automatically hang up on calls, effectively blocking them and preventing them
from even getting to your voicemail.

Note that third-party call blocking apps always seem to have some mixed reviews.
They don’t appear to work well for some people, and this may depend on your specific
Android phone. If the above app doesn’t work for you, you may want to try another
call blocking app from Google Play.
They don’t appear to work well for some people, and this may depend on your specific
Android phone. If the above app doesn’t work for you, you may want to try another
call blocking app from Google Play.

How to Set Out of Office (Auto Reply) in Outlook 2003, 2007, 2010 and 2013
The following instruction is fit for Outlook 2003 and 2007 for both with and without Exchange Server.
It is also fit for Outlook 2010 and 2013 without Exchange Server.
If your email account is connecting to Microsoft Exchange Server, please click here.
Step 1: Create a New mail message. You should type some text in this mail, for example:
Out of Office Auto-reply
Thank you for your email. I’m out of the office and will be back at February 25. During this period I will have Limited access to my email. For immediate assistance please contact me on my cell phone at 123456879.

If you are using Outlook 2007 and have not Classic Menu for Office, please click the Office Button on the top-left and select "Save As".
If you are using Outlook 2010/2013 and have not Classic Menu for Office, please click the File tab on the top-left and select "Save As".
Tip: Classic Menu for Office is a standard add-in which shows classic user interface in Office 2007 and 2010.
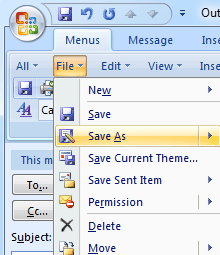
Step 3: Select "Outlook Template", click Save button.

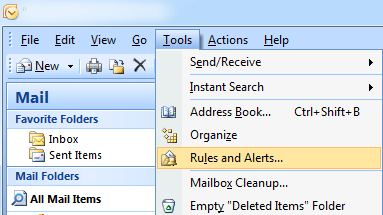
Step 4: Close the mail message and Click Tools > Rules and Alerts.
Note: The screen shot is fit for Outlook 2003 and 2007. It is also fit for Outlook 2010/2013 (with Classic Menu for Office installed).
if you are using Outlook 2010/2013 and have not Classic Menu for Office, please click the File tab on the top-left, and then click Info > Rules and Alerts..
Tip: Classic Menu for Office is a standard add-in which shows classic user interface in Office 2007 and 2010.
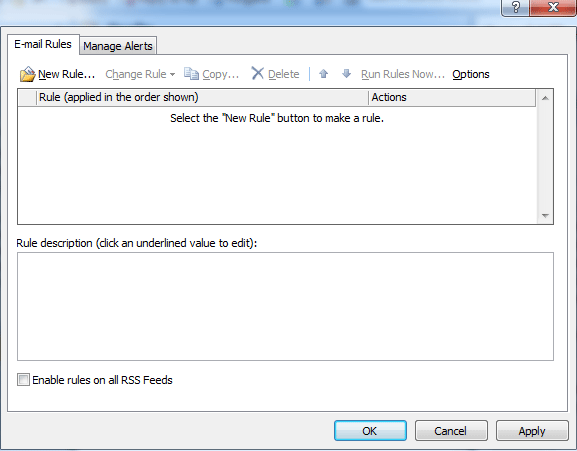
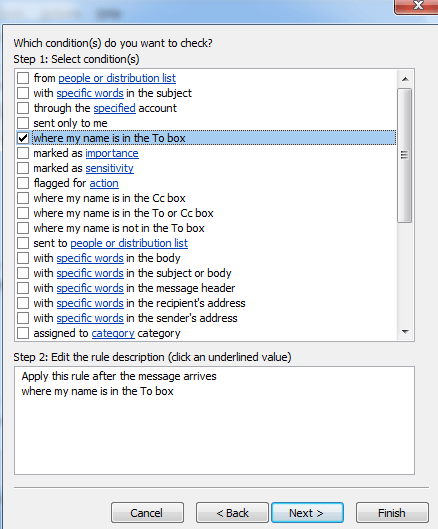
Step 5: Click New Rule.
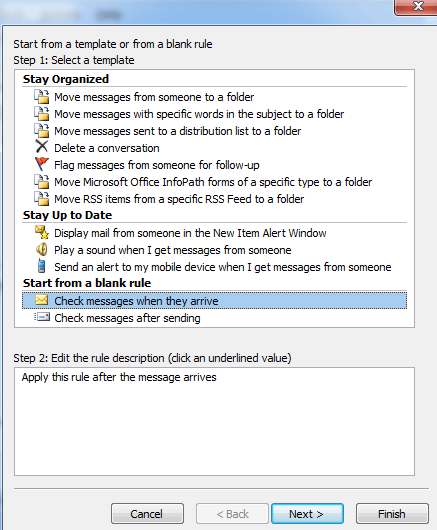
Step 6: Select Check messages when they arrive and click Next button.
Step 7: Check where my name is in the To box and click Next button.
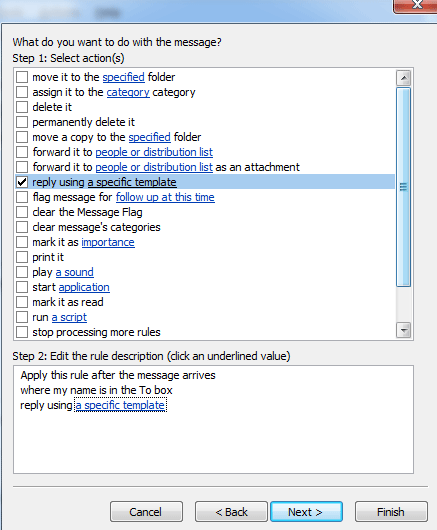
Step 8: Check reply using a specific template. And then click the label "a specific template" under "Step 2" to select template.
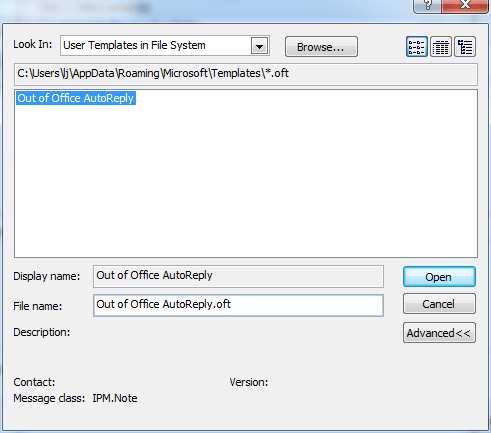
Step 9: Select "User Templates in File System" on the right of "Look In", the template "Out of Office AutoReply" which you saved will be here.
Select it and click Open button.
Step 10: Click Next button.
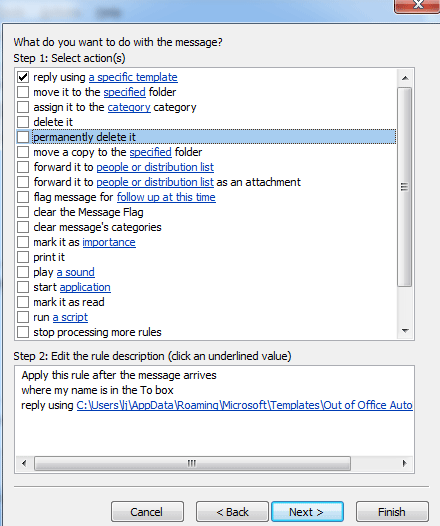
Step 11: Check except if it is an Out of Office message. Click Next button.
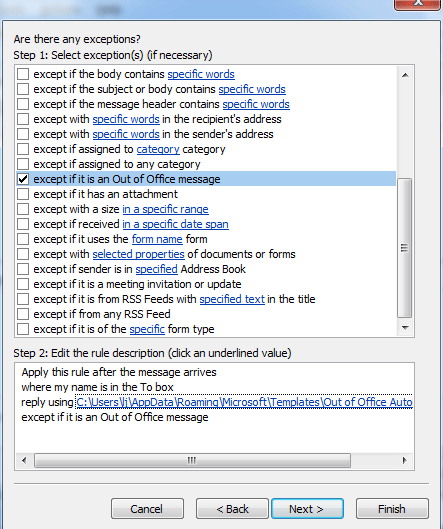
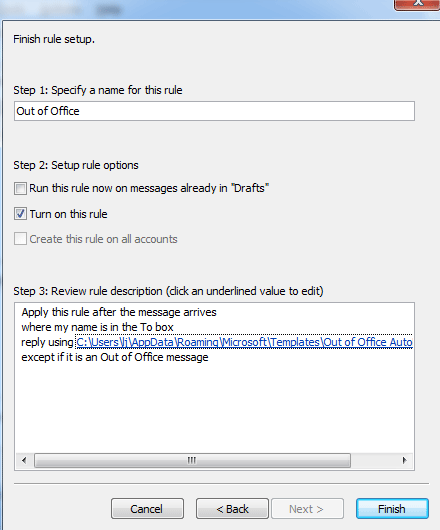
Step 12: Type "Out of Office" in the edit box to regard it as rule name. Click Finish button. it is OK now.
Here you have done. Now when you receive some emails next time, the Outlook will reply them automatically at once......
Brings the familiar classic menus and toolbars back to Microsoft Office 2007, 2010 and 2013, helps users get through the transition from Office 2003 (or 2002, 2000) to Office 2007, 2010 or 2013, and saves your money and energy on training if you are upgrading your Office.
Classic Menu for Office 2007
Classic Menu for Office 2010 and 2013 (32-bit and 64-bit)
Also Check this one...

It is also fit for Outlook 2010 and 2013 without Exchange Server.
If your email account is connecting to Microsoft Exchange Server, please click here.
Step 1: Create a New mail message. You should type some text in this mail, for example:
Out of Office Auto-reply
Thank you for your email. I’m out of the office and will be back at February 25. During this period I will have Limited access to my email. For immediate assistance please contact me on my cell phone at 123456879.
Step 2: Click File > Save As to save the message as Outlook Template.
Note: The screen shot is fit for Outlook 2003. It is also fit for Outlook 2007 (with Classic Menu for Office installed).
Note: The screen shot is fit for Outlook 2003. It is also fit for Outlook 2007 (with Classic Menu for Office installed).
If you are using Outlook 2007 and have not Classic Menu for Office, please click the Office Button on the top-left and select "Save As".
If you are using Outlook 2010/2013 and have not Classic Menu for Office, please click the File tab on the top-left and select "Save As".
Tip: Classic Menu for Office is a standard add-in which shows classic user interface in Office 2007 and 2010.
Step 3: Select "Outlook Template", click Save button.
Step 4: Close the mail message and Click Tools > Rules and Alerts.
Note: The screen shot is fit for Outlook 2003 and 2007. It is also fit for Outlook 2010/2013 (with Classic Menu for Office installed).
if you are using Outlook 2010/2013 and have not Classic Menu for Office, please click the File tab on the top-left, and then click Info > Rules and Alerts..
Tip: Classic Menu for Office is a standard add-in which shows classic user interface in Office 2007 and 2010.
Step 5: Click New Rule.
Step 6: Select Check messages when they arrive and click Next button.
Step 7: Check where my name is in the To box and click Next button.
Step 8: Check reply using a specific template. And then click the label "a specific template" under "Step 2" to select template.
Step 9: Select "User Templates in File System" on the right of "Look In", the template "Out of Office AutoReply" which you saved will be here.
Select it and click Open button.
Step 10: Click Next button.
Step 11: Check except if it is an Out of Office message. Click Next button.
Step 12: Type "Out of Office" in the edit box to regard it as rule name. Click Finish button. it is OK now.
Here you have done. Now when you receive some emails next time, the Outlook will reply them automatically at once......
What is Classic Menu for Office/Outlook
Brings the familiar classic menus and toolbars back to Microsoft Office 2007, 2010 and 2013, helps users get through the transition from Office 2003 (or 2002, 2000) to Office 2007, 2010 or 2013, and saves your money and energy on training if you are upgrading your Office.
Download Here:-
Classic Menu for Office 2007
Classic Menu for Office 2010 and 2013 (32-bit and 64-bit)
Also Check this one...
How to set out of office in outlook 2010 & 2013?
How to download Facebook videos to your computer online- Step by step
1. Play your Facebook video and copy the link from the browser.

Download facebook video step 1
2. Now go to downvids.net paste your link in the given space, select video quality & format and then Press “Download” or Right click.
Check the box “Download in HD Quality” if you want to download video in highest possible quality.

How to download facebook video step 2
3. Your file will start downloading. Give it some time to download, which depends upon the file size.
Tips
If you want to download multiple videos, refresh your downvid.net’s page after you download one video.
Share this tutorial with your family and friends. Ask anything in comment.
You just learned about How to download Facebook video to your computer online.
For more valuable stuff, visit HackTechTips.
You may also like this See Your Facebook Journey as A video in Just 62 seconds..


