Showing posts with label Tips n Tricks. Show all posts
Top 15 WhatsApp Tricks for Android and iPhone
1. Recover Deleted Messages
It happens that we unknowingly delete messages on Whatsapp and then regret for it. But now you can recover deleted message on Whatsapp by using this simple trick.
WhatsApp stores all your messages on your phone’s external memory (SD card) and for the same reason you can recover deleted messages. Go to SD card > WhatsApp > Databases and find these two files named (msgstore-yyyy..dd..db.crypt andmsgtore.db.crypt ). The first file has all the messages that you have sent or received in last seven days and the second file has the messages of the current day.

There’s no way to restore chats directly from WhatsApp, so if you want to restore a backup you’re going to have to uninstall and reinstall WhatsApp. When you start WhatsApp after the reinstall, you should be prompted to restore your most recent backup. Just follow the procedure and your chats should all be back.
2. Get Messaging Statistics On Android
This will definitely interest you if you’re a statistics geek, or simply someone who’s interested in finding out you and your friends’ WhatsApp habits. WhatStat provides information for metrics such as your top friends, friends’ and groups’ most active times of the day as well as message distribution for both one-on-one and group chats.

3. Send Two Pictures as One
Have you received an image where at first you see a beautiful girl and when you click on the image you get to see a monkey? No doubt girls are monkeys but here’s how you can do that. There’s no trick but an app to do it. Try Magiapp tricks for WhatsApp for android and FhumbApp for iPhone. Using them you can hide your best pics inside others. Unfortunately there’s not much you can do if you own a Windows phone or BlackBerry.
4. Find Friends Profile Picture
Sometimes some of our friends put really cool kind of profile picture and we wish to download it. By default WhatsApp doesn’t come with any of the downloading option, but there is a simple workaround to get your friends profile pic. Go to SD card > WhatsApp and Profile Pictures, here you can find all the profile pictures of your friends associated with their mobile number and not names.
5. Change Your Fiends Profile Picture
Another WhatsApp trick is to change your fiends profile picture. This change will take effect only on your phone and not everyone else. But I think that’s enough to make your friend say how did you do this!
Follow below steps to do it.
- First select a profile picture that you want to set for your friend (anything funny)
- Resize the photo to 561×561 pixel
- Rename the photo with your friends mobile number
- Now save the image in SD card > WhatsApp > Profile picture
- Put your phone in to flight mode or disable Network and WiFi connectivity
6. Get WhatsApp Notifications On Desktop
If you’ve ever missed a WhatsApp message while working on your desktop, you’ll know how annoying it can be. If you’re using Android, there are a few ways to make sure that you never miss a WhatsApp message again. You can use Pushbullet, which includes notification mirroring alongside a lot of other features, but if all you want is notifications on your computer, check out Desktop Notifications.
7. Stop Automatic Multimedia Content Download
In the earlier version of WhatsApp all the videos, audios and images that your friends sent to you were downloaded automatically. But with the latest update WhatsApp has given an option to stop automatic downloading of multimedia contents. To do this go to Settings -> Chat Settings -> Media auto-download -> and uncheck all the options namely ‘When using mobile data’, ‘when connected on WiFi’ and ‘When roaming’.
8. Create a Fake Conversation
Noticed the fake conversations between Sachin Tendulkar, Virat Kohli, Rahul Dravid and Suresh Raina prevailing on Facebook? Ever wanted to do that yourself? With the help of an app like WhatSaid for android and Fake-a-Message for iOS you can easily create fake conversations and play pranks on your friends. Don’t use it to spoil someone’s life though, please.
9. Stop WhatsApp Images From Appearing In Gallery Or Camera Roll
Having WhatsApp images in your Gallery or Camera Roll can be very annoying; maybe the images are somewhat private, or you just don’t like having these images clutter up your Gallery or Camera Roll. You can fix this on both iOS and Android.
On iOS, it’s pretty simple; just go to Settings > Privacy > Photos and then turn the WhatsApp Switch Off.
On Android, you have to create a .nomedia file in WhatsApp’s images or video directories. To do this, you need a file explorer such as ES File Explorer. Navigate to the images or video folders. Tap the New button in the lower left, pick File and create a file named .nomedia. This will stop the Gallery from scanning the folder.
10. Lock Your WhatsApp
Privacy is important to everyone, but while using WhatsApp you don’t have any inbuilt security option to secure your conversation. If you’re using Android, there’s WhatsApp Lock, while BlackBerry users will want to check out Lock for WhatsApp.

11. WhatsApp Chat Heads On Android
One of the best things about Facebook Messenger is its chat heads functionality. We’ve talked about bringing chat heads features to SMS before, but now you can also have chat heads for your WhatsApp conversations too, using WhatsApp Chat Heads. As the name suggests, the app works alongside WhatsApp to add chat heads for your conversations.

12. Send PDF, APK, ZIP & More
Unlike most chat apps, WhatsApp doesn’t allow you to send documents. WhatsApp has restriction on what file format you send using the app. You can only send videos, images and audios using WhatsApp, but what if you have to send PDF, ZIP and other formats? Here is a simple trick to send PDF, APK and ZIP files using WhatsAPP.
Follow these steps:
- Download and Install Dropbox app and CloudSend app on your phone
- Open CloudSend, next you’ll be asked to link CloudSend with Dropbox, allow it.
- Now share the file or document you want to send on CloudSend
- After sharing, CloudSend will automatically upload that file with Dropbox and will give a link to that file
- Now share the link with your friends so that they can download your file. A Bit time-consuming yet effective way to share unsupported formats.
13. Create Shortcuts For Important Contacts
Want to speed up your WhatsApp communication? How about creating a shortcut to your favorite Whatsapp contact or group straight from your homescreen?
On Android, this is as simple as long pressing on the group or contact you want to create a shortcut for. When the menu pops up, just tap on Add conversation shortcut. This will create a shortcut to the contact or group you have chosen right on your homescreen.
 14. Change Phone Number Linked With WhatsApp
Bought a new sim card? Want to change your old number associated with WhatsApp without losing access to the groups you had joined? Here’s how you can do it. Go to Settings -> Account -> Change Number -> Type both your old and new phone number and hit ‘Done’.
15. See Someone Whatsapp Messages (Even If It Has Been Deleted) !!!
This is not whatsapp hacks actually this is a trick.and these trick is to know the messages that has been sent or received by your victim on his or her whatsapp (even if he or she has deleted those messages) Whatsapp store all his messages i.e it makes a backup of messages on your phone in sd card and keep it for 7 days so You can see someone messages through that backup using this way to hack whatsapp
- Here is how to do it
You need to get access to victim phone first and then open /sdcard/WhatsApp/Databases/
There are two types of files database
-msgstore-yyyy..dd..db.crypt and -msgtore.db.crypt
There should be 7 files of this type these are the backups of chats which whatsapp has made for the last 7 days.
 This is temporary database made by whatsapp which store the messages of the same day.(this is not a backup).So even if someone deletes the messages as soon as she or he has send it it get stored in this file so if you can decrypt this file then you can access the today messages that are deleted within 15 min or 2 min or 1 hr of when they are send and was not backup up.
Then copy msgstore-yyyy..dd..db.crypt into your phone or cloud either by bluetooth or other sharing technique.
Before doing this, make backup of your whatsapp database by coping it in another folder then replace it with the db file you just copied from your victim phone into your whatsapp database folder.
And you are done you have hack whatsapp and now you can see every chat of the person even if he he/she has deleted the chat or not.
Note:- The second file will not get recover in the whatsapp because it is not a backup file so use the second method.
Or
You can try WhatsApp’s own Solution to Recover second file.
WhatsApp itself provide a solution to recover your accidentally deleted WhatsApp messages.All you need to do is uninstall the app and install it back. This would actually use all the backup files, and restore whatever it can.
HOW TO CREATE A TORRENT ?
Torrents are great, they are the best way to share large files with your friends, or even with people you don't know at all. But surprisingly enough, not many people create torrents when they need to share something. I have "a lot of" friends who know how to download torrents, but when they need to send me their latest 200MB vacation picture collection, they ask me to "get on msn".
It’s not that I have anything against msn (although the file transfer sucks), but why don’t just use BitTorrent? Especially if you want to send something to more than one person, or if you want to share high quality HDTV files, because then you can share the bandwidth.
So how do you do this? Well it’s very simple. Open your favorite BitTorrent client and do the magic trick:
file > create torrent
That’s all? Well almost. All you need to do now is put in the tracker info and tick some boxes. This can differ somewhat from client to client but it all comes down to the same thing.
uTorrent
1. File > Create new Torrent (or CTRL + N)
2. Select the files and or directories
2. Select the files and or directories
3. Trackers: This is probably the hard part for most people. But it’s pretty easy, just put in one of the popular public trackers. You can use one or more trackers, but in general one is enough.
Here are some good trackers you can use:
http://open.tracker.thepiratebay.org/announce
http://www.torrent-downloads.to:2710/announce
http://denis.stalker.h3q.com:6969/announce
udp://denis.stalker.h3q.com:6969/announce
http://www.sumotracker.com/announce
Put one of these in the tracker box
4. Do NOT tick the private torrent box (unless you’re using a private tracker)
5. Save the torrent and send it to your friends
Bitcomet

1. File > Create Torrent (or CTRL + M)
2. Select the files and or directories
3. Select “enable public DHT network” from the dropdown box
This way you can be your own tracker if the public tracker goes down.
This way you can be your own tracker if the public tracker goes down.
4. Tracker server and DHT node list
Again, This is probably the hard part for most people. But it’s pretty easy, just put in one of the popular public trackers. You can use one or more trackers, but in general one is enough.
Again, This is probably the hard part for most people. But it’s pretty easy, just put in one of the popular public trackers. You can use one or more trackers, but in general one is enough.
Here are some of the most popular trackers at the moment:
http://open.tracker.thepiratebay.org/announce
http://www.torrent-downloads.to:2710/announce
http://denis.stalker.h3q.com:6969/announce
udp://denis.stalker.h3q.com:6969/announce
http://www.sumotracker.com/announce
Put one of these in the tracker box
5. Save the torrent and send it to your friends
Azureus

1. File > New Torrent (or CTRL + N)
2. Tick “use an external tracker”.
And again, This is probably the hard part for most people. But it’s pretty easy, just put in one of the popular public trackers.
And again, This is probably the hard part for most people. But it’s pretty easy, just put in one of the popular public trackers.
Here are some of the most popular trackers at the moment:
http://tracker.prq.to/announce
http://inferno.demonoid.com:3389/announce
http://tracker.bt-chat.com/announce
http://tracker.zerotracker.com:2710/announce
Put one of these in the tracker box
3. Select single file or dicectory, click NEXT and point to the file or directory you want to share, and click NEXT
4. Do NOT tick “private torrent”
5. Do tick “allow decentralized tracking”
6. Save the torrent and send it to your friends
& you are done.....
4 Ways to Boot into Safe Mode in Windows 8
Are you struggling to boot into Safe Mode in Windows 8 or Windows 8.1?
Have you tried pressing both F8 and Shift+F8 and they don't work? That's because a lot has changed with the boot procedure in Windows 8 and Windows 8.1. The boot has become so fast that it literally cannot be interrupted by any of your keypresses. Here are 4 ways in which you can boot into Safe Mode, that don't involve any special hacks or manual configuration.
Safe Mode in Windows 8 and Windows 8.1
Safe Mode in Windows 8 and Windows 8.1 is not too different from the Safe Mode found in earlier versions of Windows.

The operating system still loads only the most basic drivers and services, so that it can display a minimal useful interface. The only important difference is that the minimum screen resolution used by Safe Mode has risen from 800x600 pixels to 1024x768 pixels.
1. Use the System Configuration Tool (msconfig.exe) - works in Windows 8 & 8.1
The easiest method for booting into Safe Mode is to use the System Configuration tool, also known as msconfig.exe.
Go to the Boot tab and, in the Boot options section check the box that says "Safe boot". Then, click or tap OK.

You are informed that you need to restart your computer. Click Restart or Exit without restartdepending on whether you want to restart now or later.

At the next restart, Windows 8 and Windows 8.1 start in Safe Mode.
2. Use Shift + Restart - works in Windows 8 & 8.1
Another method is to press the Power button at the Windows login screen or in the Settings charm. Then, press and hold the SHIFT key on your keyboard and click Restart.

Windows asks you to choose an option. Press Troubleshoot.

In the Troubleshoot screen, press Advanced options.

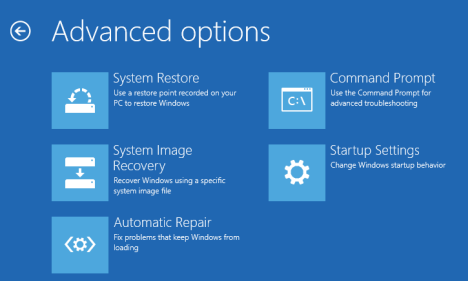
In the Advanced options screen, press Startup Settings.
You are informed that you are about to restart in order to change several Windows options, including enabling Safe Mode. Press Restart.

Your computer or device restarts again and displays nine startup settings, including Safe Mode, Safe Mode with Networking and Safe Mode with Command Prompt.

Press the F4 key on your keyboard, to enable Safe Mode, F5 to enable Safe Mode with Networking and F6 to enable Safe Mode with Command Prompt. Windows 8 and Windows 8.1 now boot according to the setting you selected.
3. Boot from a System Recovery CD/DVD - works only in Windows 8
In Windows 8, but not in Windows 8.1, you can create a system recovery CD or DVD.
Once you have that disc created, boot from it. When asked to press any key to load its content, do so.
First, you are asked to choose your keyboard layout. Press the layout you want to use. If you want to browse through the available options, press "See more keyboard layouts" until you find the one you want to use.

Then, the Choose an option screen is shown.

From here on, the steps are identical to those shown for method 2.
If you have modern PC with a UEFI BIOS and a fast SSD drive, there's no way you can interrupt the boot procedure with your keypresses. On older PCs, with a classic BIOS and no SSD drive, pressing these keys might still work though.
4. Use F8 or Shift + F8 (doesn't work when using UEFI BIOS & SSDs)
In Windows 7, you were able to press F8 just before Windows got loaded, to open theAdvanced Boot Options window, where you could choose to start Windows 7 in Safe Mode.
Some websites advise you to press Shift+F8, just before Windows 8 or 8.1 starts loading so that you make it start the recovery mode, from where you can boot into Safe Mode. The problem is that, most times, Shift+F8 and F8 don't work, even though they are correct commands, supported by Windows 8 and Windows 8.1.
This official blog post from Microsoft (Designing for PCs that boot faster than ever before) explains that this behavior is caused by their work in designing a very fast boot procedure. Both Windows 8 and Windows 8.1 have the fastest boot times ever. To quote Steve Sinofsky:
"Windows 8 has a problem – it really can boot up too quickly. So quickly, in fact, that there is no longer time for anything to interrupt boot. When you turn on a Windows 8 PC, there's no longer long enough to detect keystrokes like F2 or F8, much less time to read a message such as "Press F2 for Setup." For the first time in decades, you will no longer be able to interrupt boot and tell your PC to do anything different than what it was already expecting to do."
How to create signature in Gmail with image, logos and HTML links
 In this post we will see how to create signature in Gmail with image, logos and HTML links. One of the best ways to promote your business or brand is by email and we have made an article about importance of email marketing.
Sending an email to your customers and loyal subscribers from your own domain name rather than using Gmail shows the uniqueness of your brand.
1. Login to your Gmail account and drop down the geared symbol at the top right corner and open settings.

2. In general settings scroll down and you will see signature settings. Enable signature.

3. You have many options to add in your signature. To add text signature enter your address details or your name. Now you can select your font styles, font size and font color.

4. To insert image in signature click insert image icon and add it align it as you wish.
5. To link the signature image click on the image you inserted and select the link icon and enter the URL of the page.

6. Once done scroll down and click save changes.

Now whenever you send an email you will have a signature added below. Hope this article helped you on how to create signature in Gmail with images, Logos and HTML links.

Tag :
How To ?,
Tips n Tricks,
7 Best Torrent Leeching and Cloud Downloading Sites
Torrents are peer-to-peer. This means that there isn't a main server; rather, people who download also upload. Those who upload are seeders, and those who don't upload are leechers.
Torrents are peer-to-peer. This means that there isn't a main server; rather, people who download also upload. Those who upload are seeders, and those who don't upload are leechers.
Here is a list of 7 best torrent leecher websites to download torrent in a fast way.... · Zbigz.com :- Its good feature is, user can upload torrent and leech that file without register . Zbigz also offer to register free or premium for store your leeched file in click zbigz accounts. and download that leeched file any time anywhere from your account with Idm and dap and other download manager.
· Quick-Torrent.com:- This is an online software that downloads torrents that a user wants and then provides them with a direct download link for the file. It also ensures that data downloaded from Quick Torrent is encrypted and your ISP doesn’t find out that you’re downloading torrents.
· PCloud.com :- This website gives you 10 GB of free space, which you can extend to 20 GB by inviting your friends to join. It also has apps for both Android and iOS patforms.

· Btcloud.io :- This is a cloud storage that has been integrated with the global BitTorrent network. It allows you to join big communities of users online. The download speed that you get here will depend on the account that you have chosen. 
· Boxopus.com :- This website downloads torrents without any software and stores it in a cloud. The user needs to provide the torrent files, magnet links or torrent page URL and they can download the torrents anonymously using an encrypted channel. You can also listen to or watch your torrents from a private page.
· Filestream.me :- A free membership on this website provides you with 1 TB of disk space. You can get a number of other options through the premium accounts. 
Here is a list of 7 best torrent leecher websites to download torrent in a fast way....
· Zbigz.com :- Its good feature is, user can upload torrent and leech that file without register . Zbigz also offer to register free or premium for store your leeched file in click zbigz accounts. and download that leeched file any time anywhere from your account with Idm and dap and other download manager.
· Quick-Torrent.com:- This is an online software that downloads torrents that a user wants and then provides them with a direct download link for the file. It also ensures that data downloaded from Quick Torrent is encrypted and your ISP doesn’t find out that you’re downloading torrents.
· PCloud.com :- This website gives you 10 GB of free space, which you can extend to 20 GB by inviting your friends to join. It also has apps for both Android and iOS patforms.
· Btcloud.io :- This is a cloud storage that has been integrated with the global BitTorrent network. It allows you to join big communities of users online. The download speed that you get here will depend on the account that you have chosen.
· Boxopus.com :- This website downloads torrents without any software and stores it in a cloud. The user needs to provide the torrent files, magnet links or torrent page URL and they can download the torrents anonymously using an encrypted channel. You can also listen to or watch your torrents from a private page.
· Filestream.me :- A free membership on this website provides you with 1 TB of disk space. You can get a number of other options through the premium accounts.
Tag :
Internet,
Tips n Tricks,
Stop Apps From Running In The Background To Save Battery, Data Usage & Memory

If so, the chances are you have a few apps that are causing problems by working in the background when they should really be resting. The resulting network connections can drain your battery in just a couple of hours, something that can prove both inconvenient and needlessly costly over time.
With Greenify, however, you can instruct Android to block apps from running in the background, not by closing them but instead hibernating them.
Greenify, the awesome auto-hibernating battery
saver, used to be a root-only app. But now, Greenify also works with non-rooted devices, with a few caveats.
The new version also improves auto-hibernate stability, especially on phones running Android 4.4 and above. Hit the link to try out the new version.
Greenify is one of the best app for Android. It prevents apps from running in the background and can prolong your battery life, stop apps using your data allowance and free up memory for other tasks. Here’s how to use it......

1. A Simple User Interface
The most effective apps are simple to use, and Greenify is no different. The first screen will list your Hibernated apps, but of course on first run this will be empty. To add an app to the list, tap the + button to display a list of all apps.
2. The App Analyzer
The screen listing your apps is the App Analyzer, where you will see your apps grouped into categories such as Running in background, Scheduled running and May slow down the device. If the app you wish to hibernate isn’t listed, tap More or use Search (top-right corner).
3. Browse the app list
The Search button returns you to the Home screen where you can find the app you wish to add to Greenify using the App Picker tool. You can also browse through the app list, tapping the App Picker button in the Notification Area when the app is running.
4.Select Multiple Apps to Hibernate
In the App Analyzer you can simultaneously hibernate multiple apps by selecting each in turn. Just as easily, you can select a single app. To apply Greenify’s hibernation magic, tap the tick button in the top-right corner. Greenify will inform you that the app is being hibernated.
5. Managing the Hibernated List
As you hibernate resource-hogging apps, they will be added to the Hibernated list, the first screen you encounter when running the app. This vital screen enables you to launch hibernated apps by tapping Play; similarly you can put them back to sleep using the Zzz button.
6. Which Apps Should You Hibernate?
The App Analyzer list can prove a little tricky to handle, especially if you don’t know which apps are draining your battery. Apps listed as Running in background should be your priority as these will be using up resources. You should only hibernate those you don’t need regularly, however.
7. Scheduled Running Apps Drain Battery
Apps listed under Scheduled running, meanwhile, can perhaps be the most dangerous. If there is no need that you can see for an app to run on a scheduled basis, then you should consider hibernating it so that it is only activated when you permit it.
8. Some Apps Slow Android
Any apps listed under the May slow down the device heading are those that rely on particular events causing them to launch. These are resource-heavy apps that should only be used in certain scenarios – again, this list should be short, focusing on regularly used apps such as backup tools.
9. Hibernate Apps, Save Your Battery
Battery performance can be improved using Greenify, and apps that you have hibernated are easily “woken up.” For added control, you can use the Disable auto-hibernation menu option to prevent hibernation of any apps.Once apps are Greenify-ed, you should notice an immediate improvement in battery life and network bandwidth!


